 Cookie Editor

Google Chrome
Get on Chrome Web Store ↗Installation steps
Choose Add to Chrome, review the prompt and open Cookie Editor from the Extensions menu.
Find the extension for your browser, then follow setup and troubleshooting steps for managing cookies.
Download Cookie Editor
Install Cookie Editor separately in each browser and profile where you want to use it. Check the table for the setup route that matches your device.
| Platform | Supported Browsers | Devices |
|---|---|---|
| Desktop | Chrome, Firefox, Edge, Safari or Opera | Windows, macOS or Linux, depending on browser |
| Android | Firefox for Android | Android phones and tablets |
| iPhone and iPad | Safari extension setup | iPhone and iPad |
Choose the store that matches your browser. Follow the store’s installation prompt.
Choose Add to Chrome, review the prompt and open Cookie Editor from the Extensions menu.
Choose Add to Firefox, confirm the prompt and open the add-on from the Extensions menu.
Select Get, confirm the prompt and check the Edge toolbar or Extensions menu.
Get the app, then open Safari Settings and enable Cookie-Editor under Extensions.
Choose Add to Opera and check the extension manager if the toolbar icon is missing.
Hear how to choose a browser store, confirm installation and find Cookie Editor in your extensions menu. The install prompt can look different in your browser.
Start with Firefox for Android. Open its add-ons menu or the Mozilla listing from inside Firefox and check whether the installation option is available on your device. After installing, open the site you want to inspect and find Cookie-Editor through the browser’s extensions menu. If the option is missing, confirm which browser is handling the store link before you try again.
Open the Apple App Store listing on your device, then enable Cookie-Editor in Safari’s Extensions settings after installing it. Open Safari and try it on a page you control. If Safari asks for permission to read the site, check the domain shown in the prompt. Depending on your software version, Safari settings may be grouped under Apps in the Settings app.
Cookie Editor uses browser permissions to read and change cookies. Review the install prompt and check which websites the extension can access in your browser settings.
| What to check | Why it matters | What to do |
|---|---|---|
| Cookie access | Viewing and editing cookies requires browser permission. | Read the permissions on the browser’s install prompt before proceeding. |
| Site access | A site restriction can prevent Cookie Editor from reading the active tab’s cookies. | Check the extension’s site access settings and start with a page you control. |
| Values shown on screen | Some cookie values may contain private sign-in information. | Keep these values out of screenshots, shared files and support requests. |
Share your browser name, extension version, the steps you followed and the result. If you include a screenshot, use a test cookie such as a theme preference.
Open a test page that you own after installing the extension. Click the extension icon and look for a familiar cookie name such as theme or language. Click the entry to inspect its details. Start by reading a value so you can see how the panel is organized before you make a change. If you want to record what you found, write down the preference name and the result you observed.

The search field helps narrow a long list when you already know part of a cookie name. The main list shows cookies for the active tab. Open an entry to see the available fields and controls for that cookie. The illustration uses example data to explain these parts. Your popup can vary by browser and extension version.
If a search returns no results, clear it first and check the unfiltered list. Then narrow the list using part of the preference name. The demo panel here illustrates the parts of the interface, while exact control placement may differ in the version you installed.
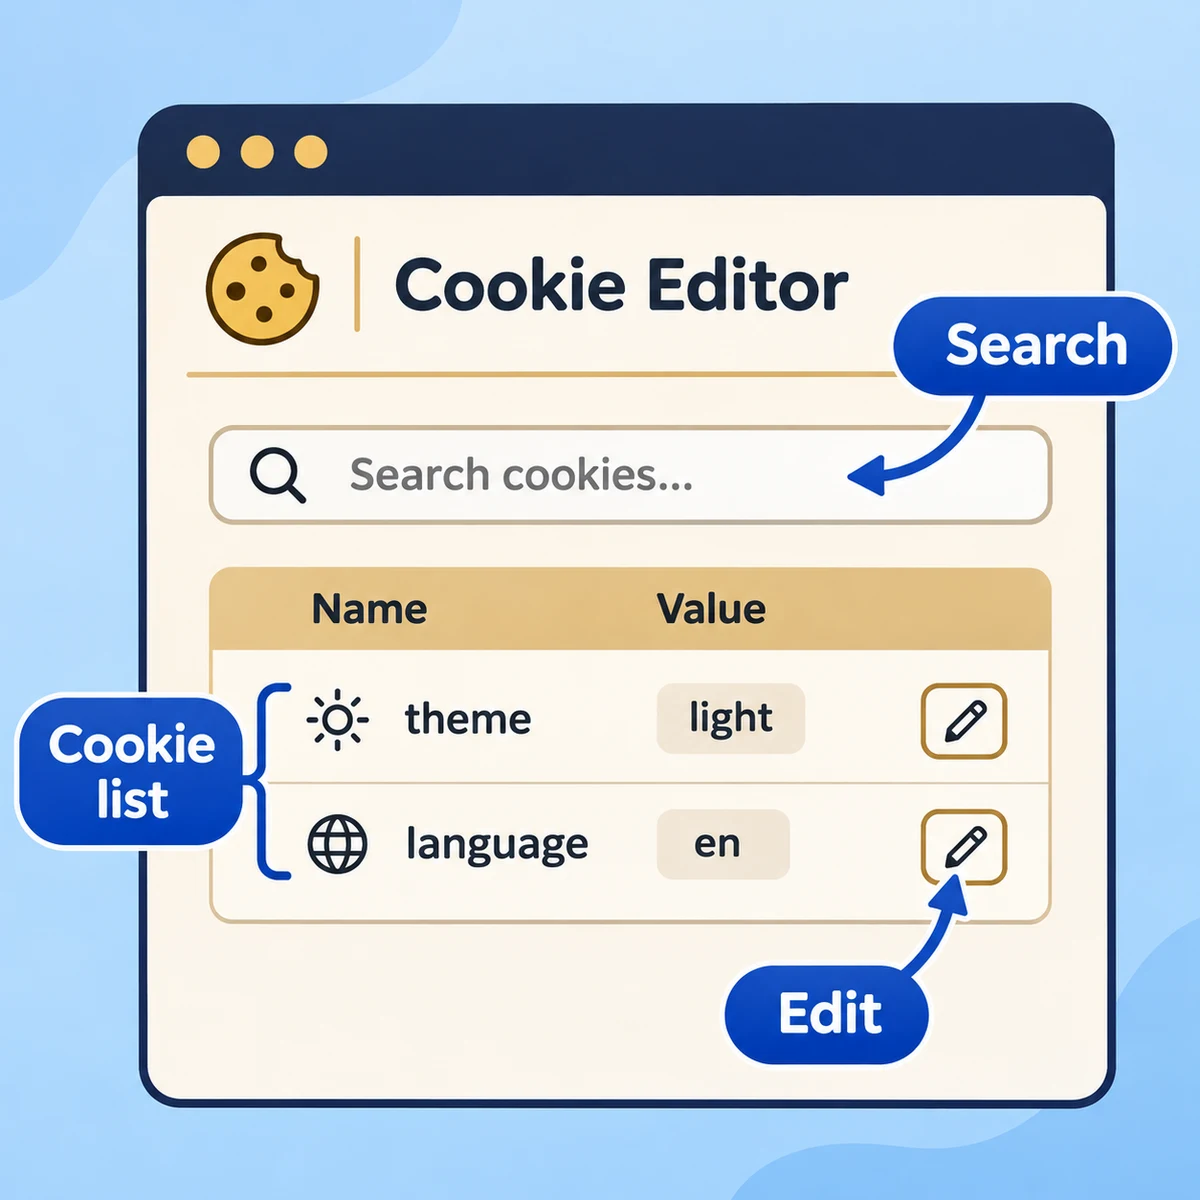
The name identifies the setting and the value stores its current state. For example, a cookie named theme might contain the value light. Domain and path help determine where the cookie applies. An expiration date indicates when the browser is expected to discard it. Check the domain and path when two entries have the same name. They can refer to different parts of a site.
Use the expiry field to investigate why a preference disappears after a while. If a cookie is still present after a page reload, the site may have written a fresh copy. Compare the name, value and expiry before and after the reload to see what changed.
| Name | theme |
|---|---|
| Value | light |
| Domain | example.com |
| Path | / |
On a test page you control, try changing a harmless display preference such as theme from light to dark. Save the change and reload the test page to see whether the site reads the new value. To practice deleting, remove a temporary preference you created for the test. A page may restore its default setting or set a new cookie when it reloads. Record what happened so you can tell a saved edit from a change the page made later.

Create a separate test cookie on a page you control. Use a name you’ll recognize so you can find and remove it later.
Open Cookie Editor in the same tab. Before adding anything, search for demo_theme so you know whether the name is already in use.
Use demo_theme for the name and light for the value. Check that the domain and path apply to your test page before saving.
Search again for the exact name. Reopen the extension after a reload and compare the saved value and path with what you entered.
Remove the temporary cookie by name after checking that its domain and path match the record you created.
In your test tab, search for demo_theme. If more than one entry appears, use the domain and path to identify yours.
Delete that entry, reload the page and reopen Cookie Editor. Search again for the same name.
If the entry is gone, the cleanup is complete. If the site writes it again, compare the new value and expiry before deciding what to test next.
A site can save a default preference when you reload it. Check whether the same name appears again only after loading the page.
The extension offers formats such as JSON, Netscape and an HTTP header string. Choose the format expected by the application that will read your sample data. Test with a single dummy preference file first and inspect it before using it again. Keep actual sign-in cookies private and use sample entries when demonstrating an import or export.
JSON is often convenient when you want to review structured sample data. Select Netscape format when a tool explicitly says it expects that format. Keep the format name in your test notes so you can repeat the same check if a parser rejects the file.

Open Cookie Editor in the same browser profile as the tab you want to inspect. Work, personal and guest windows can have separate extensions and cookie data, even when they display the same address.
| Situation | Where to look |
|---|---|
| Cookie Editor appears in another window | Compare the profile names or avatars on both windows. Enable or install the extension in the profile you actually use for testing. |
| The same site shows a different value | Compare the same site, profile, and cookie name. A preference saved in a personal profile can differ from the one saved in a work profile. |
| The extension is missing in a private window | Check whether your browser allows it in private windows. Use a normal window for your first test. |
Find the symptom you’re seeing, then follow the checks in its box.
Use your browser’s extension manager to check the installed version, pause Cookie Editor or remove it from the profile you’re using.
Open the extension manager, select Cookie Editor and note the version. If an update option is available, follow your browser’s prompts.
Turn the extension off, then reload your test page to see whether the behavior changes. Enable it again when you finish.
Choose Remove in the extension manager and confirm. Repeat this in any additional profiles where the extension is installed.
Removing the extension removes its toolbar controls. To clear cookies stored for a site, use that browser’s site data controls.
Open a test page directly in the supported browser where you enabled Cookie Editor. Start with a page you control that saves a simple preference such as a theme.
On Firefox for Android, check the extensions menu. On an iPhone or iPad, check Safari’s extension settings and open the page in Safari.
Let the page finish loading, then open the extension so you can see the cookies for that tab.
Clear any search filter and look for the name of the preference you saved. If none appears, check the site’s permission and confirm the test page has actually saved a cookie.
The link may be opening in that app’s browser view. Open the same address in your supported browser and check its extensions menu again.
Choose a preference that controls something visible on a page you own. A theme or language setting makes it easy to compare the cookie value with what the page actually shows.
| Cookie type | What to check |
|---|---|
| Display theme | Switch the theme through the test page and see whether an example value changes from light to dark. |
| Page language | Select a language on a test page that supports it, then compare the visible language with the saved preference. |
| Sign-in or checkout data | Leave it alone during practice. Choose a display preference so you can repeat the test without changing account state. |
Yes. Use the store that matches each browser where you want to use the extension.
It is a browser extension. On Apple devices the App Store provides the app used to enable the Safari extension.
Open the extension in the browser and profile where the cookies you want to inspect are stored.
Cookie Editor works with the active page. Change tabs or visit the relevant site before opening the extension.
Open the extension from the tab you want to inspect. The cookie list reflects the active page, so it can change as you switch tabs or navigate to another website.


